Computational & Data Journalism @ Cardiff

Reporting. Building. Designing. Informing

  • Blog
  • About Us
  • Local
  • Guests
You are here: Home / Archives for python

Sharing Jupyter notebooks online

20th March 2021 by Aidan O'Donnell

You have a great Jupyter notebook you’ve been working on. If only you could share it with the world: here are some options for getting your notebook online.

If you just want to show a notebook to people without them running the code, nbviewer does the job by showing the cells and their output (beware long dataframes that won’t be cropped). Just put the notebook file (.ipynb) on github and supply the link to nbviewer. If your visitor likes what they see, they can immediately launch a functioning version via a Binder link, or download the .ipynb file. Here’s a simple example of what the user sees.

If your notebook is in a github repo you can skip nbviewer and build a working version of the notebook via https://mybinder.org/. Just supply the repository url and it will serve up all the .ipynb files, with the notebook cells ready to run.

jupyter{book} lets you build a complete book using notebook elements. Here’s an example with some notebooks.

The Voilà package “turns Jupyter notebooks into standalone web applications” or if you prefer, it puts only the cell output on the webpage. Where it gets really useful is by involving widgets from ipywidget to allow user interaction.

A github repo with Github Pages enabled can run as a webpage using a package called nbinteract but I’ve found it has trouble loading widgets, as seen in some of the tutorial pages.

Of course, Jupyter notebooks are not the only option: Kaggle, Google Colab and many more. There’s an episode of the podcast Talk Python To Me about a paper that reviewed 60 (!) different notebooks.

Filed Under: Blog, Research Tagged With: interaction, jupyter, notebooks, python, web dev

Scraping the Assembly

2nd November 2016 by Martin Chorley

Glyn is currently teaching the first-semester module on Data Journalism. As part of this, students need to complete a data investigation project. One of the students is looking at the expenses of Welsh Assembly Members. These are all freely available online, but not in an easy to manipulate form. According to the Assembly they’d be happy to give the data out as a spreadsheet, if we submitted an FOI.

To me, this seems quite stupid. The information is all online and freely accessible. You’ve admitted you’re willing to give it out to anyone who submits an FOI. So why not just make the raw data available to download? This does not sound like a helpful Open Government to me. Anyway, for whatever reason, they’ve chosen not to, and we can’t be bothered to wait around for an FOI to come back. It’s much quicker and easier to build a scraper! We’ll just use selenium to drive a web browser, submit a search, page through all the results collecting the details, then dump it all out to csv. Simple.

Scraping the Assembly

I built this as a quick hack this morning. It took about an hour or so, and it shows. The code is not robust in any way, but it works. You can ask it for data from any year (or a number of years) and it’ll happily sit there churning its way through the results and spitting them out as both .csv and .json.

All the code is available on Github and it’s under an MIT Licence. Have fun 😉

Filed Under: Blog, Teaching Tagged With: coding, data, foi, investigation, oss, python, scraping

Updating Empty Properties: Agate vs Pandas

5th November 2015 by Martin Chorley

In the lab session this week we looked again at the Freedom of Information act and considered a request to Cardiff Council for the list of empty properties in Cardiff. Last year we did a very similar session, but this year I carried out the simple data analysis slightly differently.

[Read more…]

Filed Under: Blog, Teaching, The Lab Tagged With: agate, coding, data, foi, pandas, python, tools

Empty Properties & Postcodes

5th January 2015 by Martin Chorley

As part of the course we hold a weekly session where we try and tie together Journalism and Computer Science: “The Lab”. One of the first sessions we held looked at the results of a Freedom of Information request – tying together a commonly used journalistic tool with some simple coding and data analysis.

Glyn had submitted a Freedom of Information request to Cardiff Council asking for the number of empty properties across the city. This was partially successful, as it turns out the information was already published on the Council website. Unfortunately, as is common with many council documents, the data was made available as a .pdf file. This is a terrible way to have to receive data, as .pdf files are not easily machine readable. So, our first task was to extract the data. (It’s interesting to note that the latest version of this data has been released as an .xls file. It’s still not a fully REST compliant API spitting out lovely well formed JSON, but it’s a step in the right direction at least).

There are many excellent tools for extracting data from .pdf files, such as Tabula for instance. However, often the simplest solutions are the best, and in this case it was completely possible to just copy and paste the contents of the .pdf into a spreadsheet. Once the data was in the spreadsheet we could save it as a Comma Separated Value (.csv) file, which is a fairly simple format to deal with using some python code.

We now have a .csv file listing the postcode and parish of every empty property in Cardiff, along with the date when the property became unoccupied. It is therefore pretty easy to do some simple analysis of the data using Python. For example, we can count the number of occurrences of each parish name, and find the ten areas of Cardiff with the most empty properties:

import csv
from collections import defaultdict

inputfile = open('emptyproperties.csv', 'rU')
csv_reader = csv.DictReader(inputfile)

parish_count = defaultdict(int)

for row in csv_reader:
  parish = row['Parish']
  parish_count[parish] += 1

sorted_parishes = sorted(parish_count.items(), key=operator.itemgetter(1), reverse=True)
print(sorted_parishes[0:10])

Screenshot 2014-12-04 14.40.53


Part of creating a story around this result would be to add context to this data. Anyone with local knowledge will recognise that Butetown (including Cardiff Bay) has many blocks of rental flats, which probably explains why there are so many empty properties there. Whitchurch however is a fairly affluent middle class area, so its presence in the top ten is surprising and may require further investigation.

We can also use the dates within the data to find the postcode of the property that has been empty longest:

import csv
import datetime

inputfile = open('emptyproperties_correct.csv', 'rU')
csv_reader = csv.DictReader(inputfile)

earliest_date = datetime.datetime.now()
earliest_postcode = ''

for row in csv_reader:
 date = row['Occupancy Period Start Date ']

 if date is not '':
   py_date = datetime.datetime.strptime(date, "%d-%b-%y")

   if py_date < earliest_date:
     earliest_date = py_date
     earliest_postcode = row['Post Code ']

print earliest_postcode, earliest_date

Screenshot 2014-12-04 14.44.21


According to the data, a property in central Cardiff, near to HMP Cardiff, has been empty since 1993. Clearly, further investigation is required to find out whether the data is accurate, and if so, why the property has been empty so long.

These short little examples show how you can start to use simple bits of code to dive into and analyse data quickly, to find the interesting features hidden in the data, that with some investigation may lead on to an interesting story. In future sessions, we can go on to look at interesting ways to visualise this data and examine it further.

Filed Under: Blog, The Lab Tagged With: coding, foi, python, tools

The Importance of Owning your Toolset

19th November 2014 by Martin Chorley

This morning, upon logging in to ScraperWiki, Glyn found the following message:

ScraperWiki loses access to Twitter API

ScraperWiki loses access to Twitter API


ScraperWiki can no longer access the Twitter API, meaning that tools based on Twitter data on ScraperWiki will no longer work. As it happens, I have just written a really simple Twitter API wrapper in Python, so we thought it would be worth presenting it here as a how-to. If you understand and own the code that is gathering your data, you can obviously remove your reliance on third parties.


QUICK DISCLAIMER: this is a quick and dirty solution to a problem, so may not represent best coding practice, and has absolutely no error checking or handling. Use with caution…

The code presented here will allow you to make any API request to Twitter that uses a GET request, so is really only useful for getting data *from* Twitter, not sending it *to* Twitter. It is also only for using with the REST API, not the streaming API, so if you’re looking for realtime monitoring, this is not the API wrapper you’re looking for. This API wrapper also uses a single user’s authentication (yours), so is not setup to allow other users to use Twitter through your application.

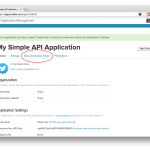
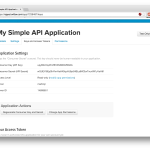
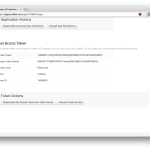
The first step is to get some access credentials from Twitter. Head over to https://apps.twitter.com/ and register a new application. Once the application is created, you’ll be able to access its details. Under ‘Keys and Access Tokens’ are four values we’re going to need for the API – the  Consumer Key and Consumer Secret, and the Access Token and Access Token Secret. Copy all four values into a new python file, and save it as ‘_credentials.py‘. The images below walk through the process. Also – don’t try and use the credentials from these images, this app has already been deleted so they won’t work!

Create a new Twitter Application
Give it a name, description and website
Check the App details

Get your Consumer Key and Secret
... and your Access Token and Secret
… and your Access Token and Secret
Store your credentials in _credentials.py

Once we have the credentials, we can write some code to make some API requests.

First, we define a Twitter API object that will carry out our API requests. We need to store the API url, and some details to allow us to throttle our requests to Twitter to fit inside their rate limiting.

class Twitter_API:

 def __init__(self):

   # URL for accessing API
   scheme = "https://"
   api_url = "api.twitter.com"
   version = "1.1"

   self.api_base = scheme + api_url + "/" + version

   #
   # seconds between queries to each endpoint
   # queries in this project limited to 180 per 15 minutes
   query_interval = float(15 * 60)/(175)

   #
   # rate limiting timer
   self.__monitor = {'wait':query_interval,
     'earliest':None,
     'timer':None}

We add a rate limiting method that will make our API sleep if we are requesting things from Twitter too fast:

 #
 # rate_controller puts the thread to sleep 
 # if we're hitting the API too fast
 def __rate_controller(self, monitor_dict):

   # 
   # join the timer thread
   if monitor_dict['timer'] is not None:
   monitor_dict['timer'].join() 

   # sleep if necessary 
   while time.time() < monitor_dict['earliest']:
     time.sleep(monitor_dict['earliest'] - time.time())
 
   # work out then the next API call can be made
   earliest = time.time() + monitor_dict['wait']
   timer = threading.Timer( earliest-time.time(), lambda: None )
   monitor_dict['earliest'] = earliest
   monitor_dict['timer'] = timer
   monitor_dict['timer'].start()

The Twitter API requires us to supply authentication headers in the request. One of these headers is a signature, created by encoding details of the request. We can write a function that will take in all the details of the request (method, url, parameters) and create the signature:

 # 
 # make the signature for the API request
 def get_signature(self, method, url, params):
 
   # escape special characters in all parameter keys
   encoded_params = {}
   for k, v in params.items():
     encoded_k = urllib.parse.quote_plus(str(k))
     encoded_v = urllib.parse.quote_plus(str(v))
     encoded_params[encoded_k] = encoded_v 

   # sort the parameters alphabetically by key
   sorted_keys = sorted(encoded_params.keys())

   # create a string from the parameters
   signing_string = ""

   count = 0
   for key in sorted_keys:
     signing_string += key
     signing_string += "="
     signing_string += encoded_params[key]
     count += 1
     if count < len(sorted_keys):
       signing_string += "&"

   # construct the base string
   base_string = method.upper()
   base_string += "&"
   base_string += urllib.parse.quote_plus(url)
   base_string += "&"
   base_string += urllib.parse.quote_plus(signing_string)

   # construct the key
   signing_key = urllib.parse.quote_plus(client_secret) + "&" + urllib.parse.quote_plus(access_secret)

   # encrypt the base string with the key, and base64 encode the result
   hashed = hmac.new(signing_key.encode(), base_string.encode(), sha1)
   signature = base64.b64encode(hashed.digest())
   return signature.decode("utf-8")

Finally, we can write a method to actually *make* the API request:

 def query_get(self, endpoint, aspect, get_params={}):
 
   #
   # rate limiting
   self.__rate_controller(self.__monitor)

   # ensure we're dealing with strings as parameters
   str_param_data = {}
   for k, v in get_params.items():
     str_param_data[str(k)] = str(v)

   # construct the query url
   url = self.api_base + "/" + endpoint + "/" + aspect + ".json"
 
   # add the header parameters for authorisation
   header_parameters = {
     "oauth_consumer_key": client_id,
     "oauth_nonce": uuid.uuid4(),
     "oauth_signature_method": "HMAC-SHA1",
     "oauth_timestamp": time.time(),
     "oauth_token": access_token,
     "oauth_version": 1.0
   }

   # collect all the parameters together for creating the signature
   signing_parameters = {}
   for k, v in header_parameters.items():
     signing_parameters[k] = v
   for k, v in str_param_data.items():
     signing_parameters[k] = v

   # create the signature and add it to the header parameters
   header_parameters["oauth_signature"] = self.get_signature("GET", url, signing_parameters)

   # add the OAuth headers
   header_string = "OAuth "
   count = 0
   for k, v in header_parameters.items():
     header_string += urllib.parse.quote_plus(str(k))
     header_string += "=\""
     header_string += urllib.parse.quote_plus(str(v))
     header_string += "\""
     count += 1
     if count < 7:
       header_string += ", "

   headers = {
     "Authorization": header_string
   }

   # create the full url including parameters
   url = url + "?" + urllib.parse.urlencode(str_param_data)
   request = urllib.request.Request(url, headers=headers)

   # make the API request
   try:
     response = urllib.request.urlopen(request)
     except urllib.error.HTTPError as e:
     print(e)
   raise e
     except urllib.error.URLError as e:
     print(e)
     raise e

   # read the response and return the json
   raw_data = response.read().decode("utf-8")
   return json.loads(raw_data)

Putting this all together, we have a simple Python class that acts as an API wrapper for GET requests to the Twitter REST API, including the signing and authentication of those requests. Using it is as simple as:

ta = Twitter_API()

# retrieve tweets for a user
params = {
   "screen_name": "martinjc",
}

user_tweets = ta.query_get("statuses", "user_timeline", params)

The full code is online on Github, and is released under an Apache 2.0 Licence.


Filed Under: Blog Tagged With: api, coding, compj, python, tools, twitter

Copyright © 2023 · News Pro Theme on Genesis Framework · WordPress · Log in