This morning, upon logging in to ScraperWiki, Glyn found the following message:

ScraperWiki loses access to Twitter API
ScraperWiki can no longer access the Twitter API, meaning that tools based on Twitter data on ScraperWiki will no longer work. As it happens, I have just written a really simple Twitter API wrapper in Python, so we thought it would be worth presenting it here as a how-to. If you understand and own the code that is gathering your data, you can obviously remove your reliance on third parties.
QUICK DISCLAIMER: this is a quick and dirty solution to a problem, so may not represent best coding practice, and has absolutely no error checking or handling. Use with caution…
The code presented here will allow you to make any API request to Twitter that uses a GET request, so is really only useful for getting data *from* Twitter, not sending it *to* Twitter. It is also only for using with the REST API, not the streaming API, so if you’re looking for realtime monitoring, this is not the API wrapper you’re looking for. This API wrapper also uses a single user’s authentication (yours), so is not setup to allow other users to use Twitter through your application.
The first step is to get some access credentials from Twitter. Head over to https://apps.twitter.com/ and register a new application. Once the application is created, you’ll be able to access its details. Under ‘Keys and Access Tokens’ are four values we’re going to need for the API – the Consumer Key and Consumer Secret, and the Access Token and Access Token Secret. Copy all four values into a new python file, and save it as ‘_credentials.py‘. The images below walk through the process. Also – don’t try and use the credentials from these images, this app has already been deleted so they won’t work!
-

- Create a new Twitter Application
-

- Give it a name, description and website
-
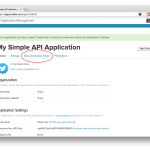
- Check the App details
-
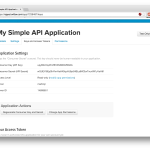
- Get your Consumer Key and Secret
-
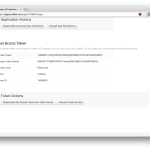
- … and your Access Token and Secret
-

- Store your credentials in _credentials.py
Once we have the credentials, we can write some code to make some API requests.
First, we define a Twitter API object that will carry out our API requests. We need to store the API url, and some details to allow us to throttle our requests to Twitter to fit inside their rate limiting.
class Twitter_API:

 def __init__(self):

   # URL for accessing API
   scheme = "https://"
   api_url = "api.twitter.com"
   version = "1.1"

   self.api_base = scheme + api_url + "/" + version

   #
   # seconds between queries to each endpoint
   # queries in this project limited to 180 per 15 minutes
   query_interval = float(15 * 60)/(175)

   #
   # rate limiting timer
   self.__monitor = {'wait':query_interval,
     'earliest':None,
     'timer':None}
We add a rate limiting method that will make our API sleep if we are requesting things from Twitter too fast:
 #
 # rate_controller puts the thread to sleep
 # if we're hitting the API too fast
 def __rate_controller(self, monitor_dict):

   #
   # join the timer thread
   if monitor_dict['timer'] is not None:
   monitor_dict['timer'].join()

   # sleep if necessary
   while time.time() < monitor_dict['earliest']:
     time.sleep(monitor_dict['earliest'] - time.time())

   # work out then the next API call can be made
   earliest = time.time() + monitor_dict['wait']
   timer = threading.Timer( earliest-time.time(), lambda: None )
   monitor_dict['earliest'] = earliest
   monitor_dict['timer'] = timer
   monitor_dict['timer'].start()
The Twitter API requires us to supply authentication headers in the request. One of these headers is a signature, created by encoding details of the request. We can write a function that will take in all the details of the request (method, url, parameters) and create the signature:
 #
 # make the signature for the API request
 def get_signature(self, method, url, params):

   # escape special characters in all parameter keys
   encoded_params = {}
   for k, v in params.items():
     encoded_k = urllib.parse.quote_plus(str(k))
     encoded_v = urllib.parse.quote_plus(str(v))
     encoded_params[encoded_k] = encoded_v

   # sort the parameters alphabetically by key
   sorted_keys = sorted(encoded_params.keys())

   # create a string from the parameters
   signing_string = ""

   count = 0
   for key in sorted_keys:
     signing_string += key
     signing_string += "="
     signing_string += encoded_params[key]
     count += 1
     if count < len(sorted_keys):
       signing_string += "&"

   # construct the base string
   base_string = method.upper()
   base_string += "&"
   base_string += urllib.parse.quote_plus(url)
   base_string += "&"
   base_string += urllib.parse.quote_plus(signing_string)

   # construct the key
   signing_key = urllib.parse.quote_plus(client_secret) + "&" + urllib.parse.quote_plus(access_secret)

   # encrypt the base string with the key, and base64 encode the result
   hashed = hmac.new(signing_key.encode(), base_string.encode(), sha1)
   signature = base64.b64encode(hashed.digest())
   return signature.decode("utf-8")
Finally, we can write a method to actually *make* the API request:
 def query_get(self, endpoint, aspect, get_params={}):

   #
   # rate limiting
   self.__rate_controller(self.__monitor)

   # ensure we're dealing with strings as parameters
   str_param_data = {}
   for k, v in get_params.items():
     str_param_data[str(k)] = str(v)

   # construct the query url
   url = self.api_base + "/" + endpoint + "/" + aspect + ".json"

   # add the header parameters for authorisation
   header_parameters = {
     "oauth_consumer_key": client_id,
     "oauth_nonce": uuid.uuid4(),
     "oauth_signature_method": "HMAC-SHA1",
     "oauth_timestamp": time.time(),
     "oauth_token": access_token,
     "oauth_version": 1.0
   }

   # collect all the parameters together for creating the signature
   signing_parameters = {}
   for k, v in header_parameters.items():
     signing_parameters[k] = v
   for k, v in str_param_data.items():
     signing_parameters[k] = v

   # create the signature and add it to the header parameters
   header_parameters["oauth_signature"] = self.get_signature("GET", url, signing_parameters)

   # add the OAuth headers
   header_string = "OAuth "
   count = 0
   for k, v in header_parameters.items():
     header_string += urllib.parse.quote_plus(str(k))
     header_string += "=\""
     header_string += urllib.parse.quote_plus(str(v))
     header_string += "\""
     count += 1
     if count < 7:
       header_string += ", "

   headers = {
     "Authorization": header_string
   }

   # create the full url including parameters
   url = url + "?" + urllib.parse.urlencode(str_param_data)
   request = urllib.request.Request(url, headers=headers)

   # make the API request
   try:
     response = urllib.request.urlopen(request)
     except urllib.error.HTTPError as e:
     print(e)
   raise e
     except urllib.error.URLError as e:
     print(e)
     raise e

   # read the response and return the json
   raw_data = response.read().decode("utf-8")
   return json.loads(raw_data)
Putting this all together, we have a simple Python class that acts as an API wrapper for GET requests to the Twitter REST API, including the signing and authentication of those requests. Using it is as simple as:
ta = Twitter_API()

# retrieve tweets for a user
params = {
   "screen_name": "martinjc",
}

user_tweets = ta.query_get("statuses", "user_timeline", params)
The full code is online on Github, and is released under an Apache 2.0 Licence.